For those that celebrate Hanukkah, I found this great link with 25 crafts to do with your kids during Hanukkah. Just thought I'd share =)
http://blogs.babble.com/family-style/2011/12/05/handmade-hanukkah-25-hanukkah-crafts-to-make-with-kids/
If you're looking for me I'll be the one scarfing down matzoh ball soup all week =)
Tuesday, December 11, 2012
Thursday, October 25, 2012
Non GMO candy options
Most if not all commercial candies are filled with non-organic and GMO ingredients. So what is a person to do for Halloween candy? Or just a stash of candy for snacking? Or pinatas? Or rewarding for potty training (haha, that's me this week)? Aside from making your own, which I've actually been working on (!!!) I have compiled a list of great options for non-gmo candy. Here I will post a list with links and a fun graphic! Read, share, tweet, and pin! Enjoy!

 Surf Sweets Jelly Beans
Buy here
They also make gummy worms, bears, etc.
 Envirokidz Chocolate Crispy Rice Bars
My grocery store sells mini versions of the full size bars in a big bag.
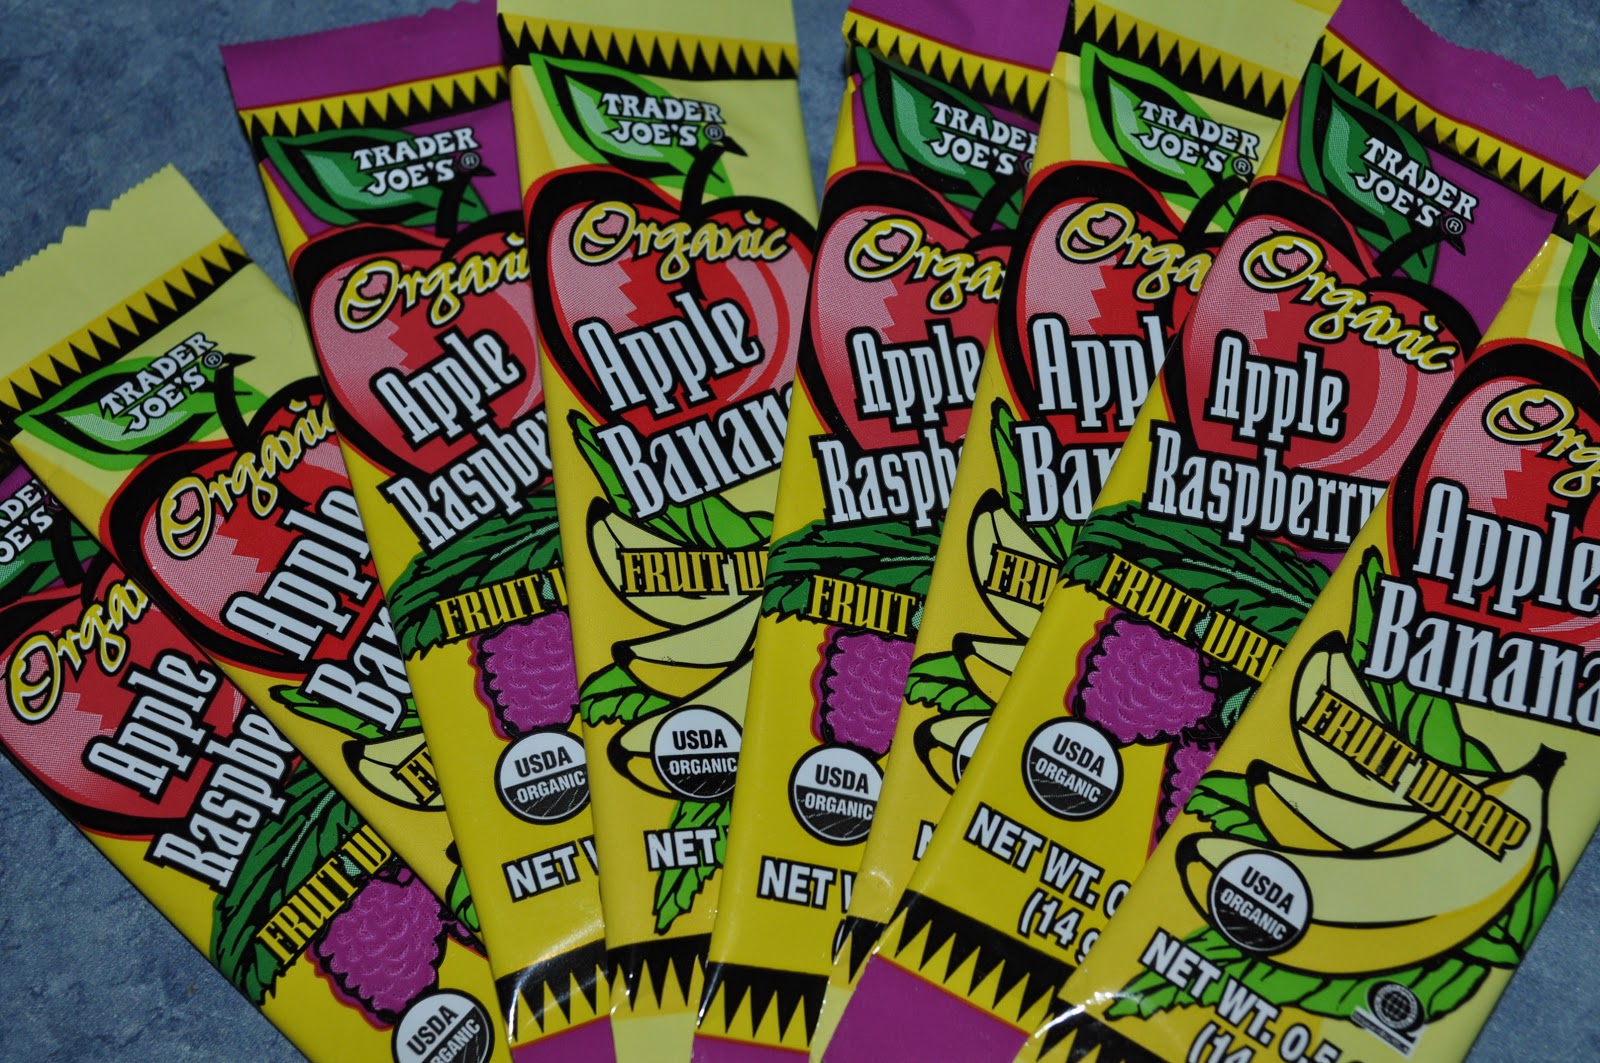
 Organic fruit wraps (These are from Trader Joes).
Don't have a TJ's, there are many other brands.
Check your grocery store, bet they have them!
 YummyEarth Organic Lollipops
Buy here
Or try their gummy bears here
 Annie's organic bunny fruit snacks
Buy here
Or try the cracker bunny packs here
 Endangered Species Chocolate Bug Bites
Buy mint here
Dark Chocolate here
Milk Chocolate here
 Righteuosly Raw mini chocolate bars.
Check out their website here
Mmm, now I want chocolate....
 And check out these organic non-gmo candy canes here
If anyone else has some options to share please help out us candy lovers and post it in the comments!


Buy here
They also make gummy worms, bears, etc.

My grocery store sells mini versions of the full size bars in a big bag.
Don't have a TJ's, there are many other brands.
Check your grocery store, bet they have them!

Buy here
Or try their gummy bears here

Buy here
Or try the cracker bunny packs here

Buy mint here
Dark Chocolate here
Milk Chocolate here

Check out their website here
Mmm, now I want chocolate....

If anyone else has some options to share please help out us candy lovers and post it in the comments!
Wednesday, October 24, 2012
French Toast with Strawberry Butter

French Toast with Strawberry Butter
Adapted from KidsCooking - A very Slightly Messy Manual
Brought to you by Amanda @ Natural and Organic Lifestyle
Serves 6
6 organic eggs
6 slices of bread
1/4 cup organic milk
1/2 vanilla extract
3/4 stick organic butter, softened, plus extra for greasing pan.
1 cup organic strawberries (stems removed)
1/4 cup organic sugar
For butter: In a blender, mix together butter, strawberries, and sugar. Set aside.
Heat your pan to medium heat. In a wide bowl, whisk together eggs, milk, and vanilla. Melt some butter in your pan. Place one slice of bread at at time in your egg mixture and let them get good and wet, don't need to soak them. Add to pan and cook on each side until just brown. Repeat with all the bread.
Top each slice of french toast with a dollop of strawberry butter. Dig in!
Wednesday, October 17, 2012
Roasting pumpkins and making pumpkin puree

The pumpkin in the picture above is not a small pie pumpkin. It's a large pumpkin, I'm talking like 10 lbs. My friend who owns a local farm stand store gave me a run down of their pumpkins. This particular one is large, but still very sweet. I felt it was the best for my money considering the size of our family. Small pie pumpkins don't need to roast as long. You could do a couple of them at a time. My large one was all I could fit on a baking sheet. Here's what I do:
~Preheat oven to 350 degrees
~Cut off the stem. Slice your pumpkin in half. Scoop out guts and seeds and set aside to make yummy pumpkin seeds later.
~Line a baking sheet with parchment paper and lay your pumpkins face down.
~Place baking sheet in oven and bake for 45-90 minutes (depending on the size of your pumpkins)
You should be able to easily poke a fork through the skin.
~Remove from oven and let cool.
~Scoop flesh out of the skin.
You can use the pumpkin at this point for recipes, or sprinkle with seasoning salt and dig in. Or you can continue on to make pumpkin puree and never buy canned pumpkin again!
~Place flesh in a blender and blend away. You want it super smooth so let it go for a minute or so. If you aren't using it in a recipe you can strain in a cheesecloth to remove excess water. My 10 lb pumpkin made about 10 cups of pumpkin puree.

And there you have it! Roasted pumpkin and pumpkin puree!
Just another way to enjoy fall even more!
Sunday, October 14, 2012
Fall and Perfectly Roasted Pumpkin Seeds

Scroll down for some pictures of fall and a recipe for perfectly roasted pumpkin seeds.


And of course, PUMPKINS!!!
Here's Jake, our newly 5 year old =)
Perfectly roasted pumpkin seeds, YUM!
 | |
| These are actually squash seeds, but they work too! |
Perfectly Roasted Pumpkin Seeds
by Amanda @ Natural Organic Lifestyle
Scoop out your pumpkin and separate the guts from the seeds.
Proceed to have a pumpkin gut fight.
Clean up said fight.
Back to the seeds.
Rinse seeds very well in a strainer.
Bring a pot of water to a boil.
Add about a ts of salt.
When boiling, dump in your seeds.
Boil for 10 minutes.
Meanwhile, preheat oven to 350 degrees.
Strain seeds and lightly pat dry. (They don't have to be super dry, just not dripping)
Line a baking sheet with parchment paper and spread seeds out on it.
Toss seeds with a little olive oil.
Sprinkle with salt and seasonings of choice.
My favorite combo is onion salt and garlic powder, YUM! But cayenne and salt is good too. There are so many choices! Or you can just do salt.
Bake for 10 minutes.
Stir.
Bake another 10 minutes.
Stir and check for doneness. Make sure the seeds inside aren't burning. You want the outside just browned.
If needed, bake longer but check every 5 minutes or so.
Baking time can vary depending on your oven.
Enjoy fall in all it's beauty and yumminess!
What are your favorite fall activities and recipes?
Wednesday, October 10, 2012
Carrot Raisin Salad
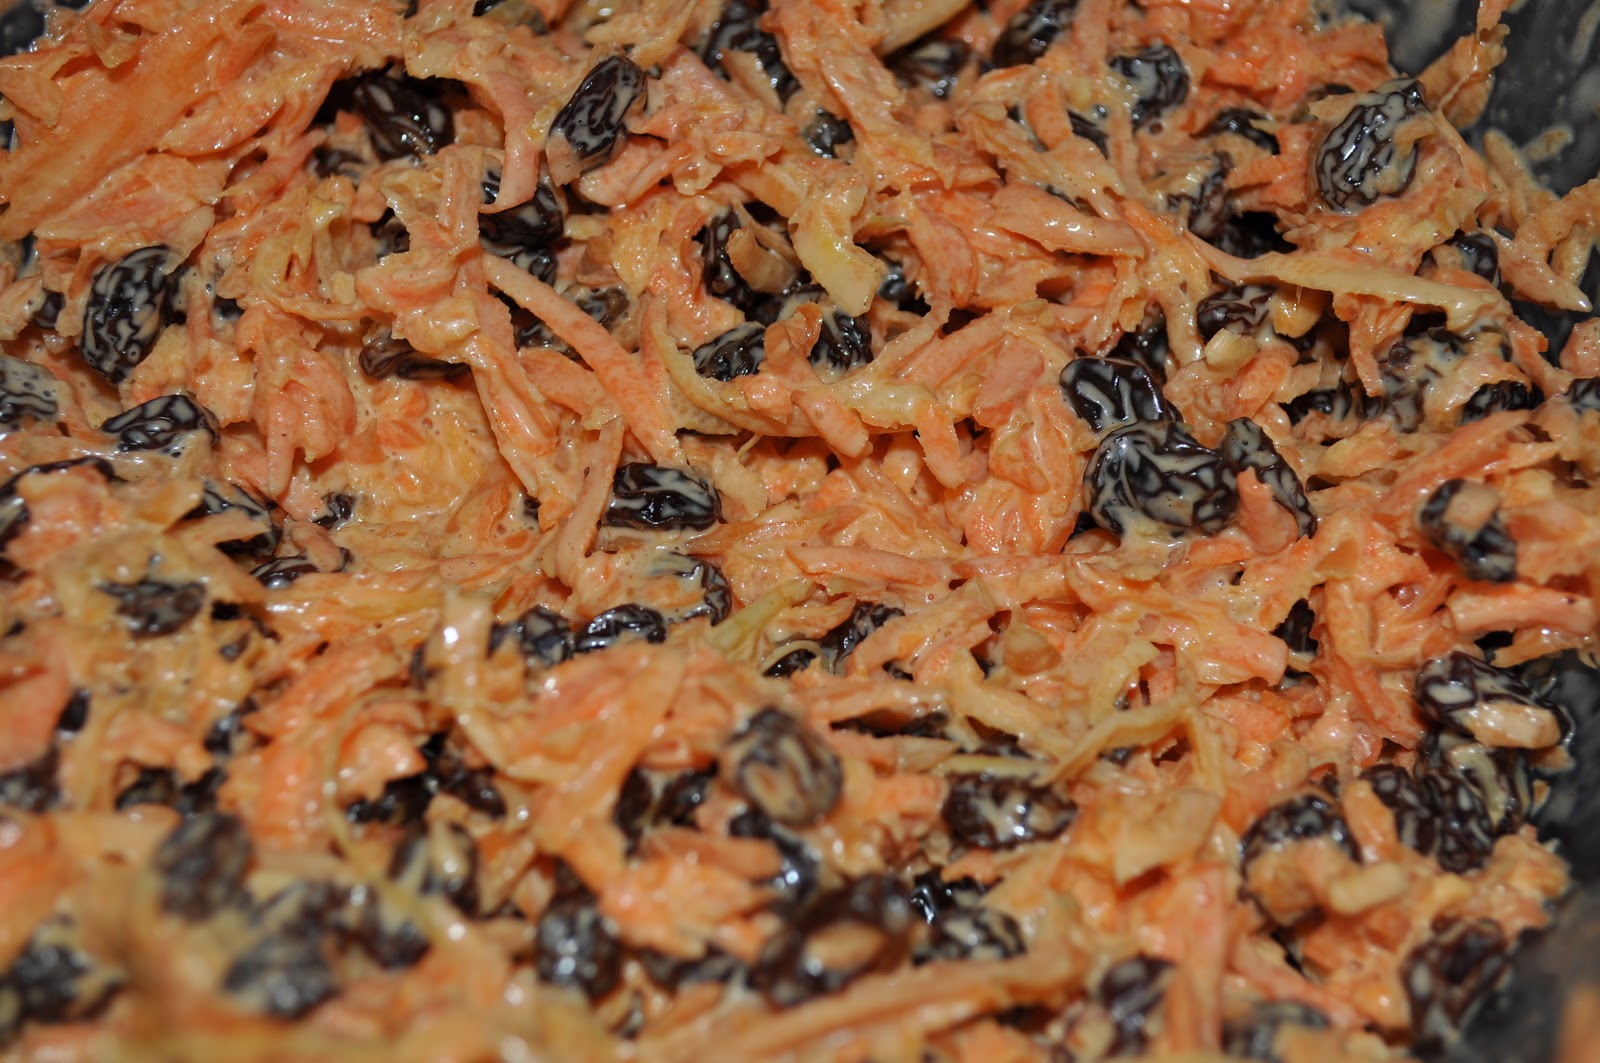
Carrot Raisin Salad
Adapted from KidsCooking - A very Slightly Messy Manual
Brought to you by Amanda @ Natural and Organic Lifestyle
5 organic carrots
3/4 cup organic raisins
1/2 cup(or to taste) Mayonnaise
Shred carrots. I had my kids use the grating disk on my food processor for the sake of saving their knuckles. But you can use a box grater too. Toss together shredded carrots, raisins, and mayonnaise. Enjoy!
Wednesday, October 3, 2012
Non GMO Awareness month 2012
It's October, which brings us upon Non GMO Awareness month. What better time to educate or re-educate yourself about GMO's. Here is a great shopping guide for avoiding GMO's. Reading labels on packaged foods is essential in this day and age. If you want to avoid GMO's and still insist on buying packaged food, you most definitely should only buy 100% organic food. Especially considering the recent announcement that now wheat products now contain GMO's, which probably means they have for awhile and just decided to tell us. I saw this great chart, if you're going to buy packaged foods, these are great organic/non-gmo options:
 Some tips to avoid GMO foods: But organic, look for non-gmo labels, avoid non-organic corn, soy, canola, and cotton, buy organic meats (though gmo meats are not approved for human consumption, gm crops most definitely are being fed to non organic raised animals).
The only real defense again genetically modified foods is to buy organic whole foods and cooking them yourself. Make your own crackers, or graham crackers,or these crackers, or make your own tortillas and turn them into chips, slice organic potatoes and coat them in organic oil and bake for some great baked chips.
Every time I hear the name Monsanto it makes my blood boil. They are purposely poisoning the world....well the parts of the world that actually let their citizens (and encourage them to) eat gmo food. Then my hubby read this blog post to me. What a great perspective on an awful situation. Seriously, thank you Monsanto for opening more and more peoples eyes everyday to what food they fuel their body with. Sure, there are tons of people out there that really just don't care, but it's OUR jobs to HELP them care! Why is cancer increasing every year? Why is heart disease? Why are younger and younger kids being treated for cancer, autoimmune diseases, and hosts of other terrible diseases at such a young age? It's the food their eating, the environment they are being exposed to, the air they are breathing. But we are finding out more and more that GMO's have a HUGE part in why so many people are sick. On a side note, we have been searching for a house to buy for years now. Last weekend I was driving through a town that we've hoped to find a house in and was seriously disturbed by the amount of GMO farms there. Yeah, we won't be buying a house there. Contaminated air, water, bugs, etc...no thank you.
In honor of Non GMO month, I challenge you all to go out there and share the dangers of GMO's with friends, family, neighbors, and strangers. Even if you don't live in California, do whatever you can to support Prop 37. If California can pass that law it will be a huge step for this whole country.
If you don't know much about GMO foods, Mercola has a whole page set up dedicated to GMO's. Check it out here for more information.
Tuesday, October 2, 2012
Homemade cough syrup

Homemade cough syrup
by Amanda @ Natural and Organic Lifestyle
Mix up in a pint jar:
Raw honey
a couple slices of lemon
a one inch sized piece of ginger chopped
That's it. Just throw it in the fridge and use as needed.
Sunday, September 30, 2012
Sauteed Bok Choy

But here is a great recipe for sauteed bok choy, which is excellent!
Sauteed Bok Choy
by Amanda @ Natural and Organic Lifestyle
1 organic bok choy
1 organic onion
2 organic cloves garlic
Using the entire bok choi, including the stalk, chop it into pieces. Saute garlic and onions in a pan with a little oil until soft. Add bok choi and cook until just softened. Add some organic soy sauce or coconut aminos, salt and pepper to taste, and enjoy!
Thursday, September 27, 2012
Drying herbs and Freezing pesto


Wednesday, September 26, 2012
Read with caution...haha (female content)
Men: you may not want to read any further, this is a female issue. Yes we're talking menstruation, lol. Any women that don't want to read about it, run away. Seriously...
Okay, you've been warned.
You might have seen earlier in the year that we got a puppy. Well, we haven't spayed her because my hubby really really really wants her to have puppies. She was a handful enough as a puppy that I cannot even imagine dealing with a litter of puppies, even for 8 weeks. Yes, I know darn well it was my stupid idea to get a puppy. I begged for a year or so. BIG mistake. Should have just had another baby...
Anyway, so early this week she starts menstruating (and yes I'm fully aware it's not called "menstruating" in dogs, it's in "heat", but I'm not positive if they are in heat before the bleed and the bleeding is just called bleeding, so I'll call it menstruating, I apologize to all the doggy experts out there). So, she started bleeding, and then I did too. What the heck?!? I know women who spend a lot of time together are known to get on the same schedule, but does it work with dogs too??? Now, I wouldn't think anything of it, but I'm early and I'm never early! Now, last night my hubby pointed out that dogs only menstruate twice a year or so and wouldn't it be great if I did too!!! Hahahaha! That would be awesome. With my luck though I would make her menstruate every month. We really need to spay her....
While we are on the subject, I'm very often asked what I use during this time being all natural and organic and everything. For a long time I used Natracare products, which are organic cotton. It felt really wasteful though so I few years ago I switched to using the DivaCup. My only concern is whether or not the silicone is safe or if you absorb anything from it. I haven't found any information on that at this time. If you aren't on a really heavy day you can 12 hours between changing it, that in my book is really awesome. I still use the Natracare pads as back up on those really heavy days. So that's that.
I'm off to have a corn husking party with my kids. Literally husking corn, 5 dozen of them...
Tuesday, September 25, 2012
Apple Cinnamon Bread

Apple Cinnamon Bread
by Amanda @ Natural and Organic Lifestyle
The dough itself makes two loaves. The ingredients below make one loaf. I make one plain and one apple cinnamon at a time. If you'd like two apple cinnamon, double up on the ingredients (apple, cinnamon, sucanat)
Dough from Easy Sandwich Bread
(optional: when making the dough above, substitute apple sauce for the oil)
1 organic apple, chopped small
1 ts organic cinnamon
1 TB Sucanat (or other organic raw sugar) plus extra for sprinkling on top
Prepare dough and let it rise the first time. After you punch down the dough and split it into two loaves, sprinkle flour on a flat surface and roll out one dough to about a half an inch thick. Sprinkle cinnamon, sucanat, and apple all over the dough. Roll up, pinch ends, and place in greased loaf pan to rise again. Optional: brush with a little butter and sprinkle sucanat on top. Once the dough has risen above the rim of the pan, bake for 35 minutes at 350 degrees. Let cool, slice, and enjoy!
Monday, September 24, 2012
Roasted Baby Turnips with Parsley Mustard Vinaigrette

Roasted Baby Turnips with Parsley Mustard Vinaigrette
1 TB organic white wine vinegar
1 1/2 ts organic whole-grain mustard
1 green onion, minced
1 1/2 TB chopped flat-leaf parsley
1/2 cup extra-virgin olive oil
Salt and freshly ground pepper
24 baby turnips (2 pounds) (could be done with large turnips too, just chop them)
- Preheat the oven to 425°. In a bowl, whisk the vinegar with the mustard, scallion, parsley and 1/4 cup of the olive oil. Season the vinaigrette with salt and pepper.
- Heat a rimmed baking sheet in the oven. Cut the turnips in half through the stems; quarter them if large. In a large bowl, toss the turnips with the remaining 1/4 cup of oil and season with salt and pepper. Spread the turnips on the baking sheet and roast for about 18 minutes, until tender. Transfer the turnips to a platter and let cool. Drizzle with the vinaigrette and serve.
Thursday, September 20, 2012
Easy Sandwich Bread

Easy Sandwich Bread
by Amanda @ Natural and Organic Lifestyle
Makes 2 loaves
2 cups warm water
1 TB yeast
1/4 cup honey
1/4 cup oil (I use light olive oil)
1 1/2 ts good salt
6-7 cups bread flour*
*The loaf in the picture above was made with unbleached white whole wheat bread flour. You can use straight whole wheat bread flour but you'll want to mix it with another flour. You can also add ground flax as well as other flours.
I use my food processor with a dough blade to mix up this dough. You could also use a stand mixer. My directions, though, will be for doing it by hand for those that don't have either. I have to say, my food processor makes it so easy. I just add all the ingredients and mix until the dough forms.
Add water, yeast, and honey to a large bowl and let it sit for a few minutes. Add the rest of the ingredients in order. Kneed until smooth and it pulls away from the bowl. Cover and let it rise until doubled. Punch the dough down and divide into two pieces. Grease two loaf pans and place dough in each. Let the dough rise until it is just over the rim of the pans. Optional: Brush butter or olive oil over the top and sprinkle with good salt. Heat the oven to 350 degrees. Bake for about 30 minutes.
Tuesday, August 14, 2012
Parmesan Roasted Potatoes

Parmesan Roasted Potatoes
by Amanda @ Natural Organic Lifestyle
6 organic medium red potatoes
4 TB organic evoo
1/2 ts real salt, or to taste
Ground pepper to taste
1/4 ts dried organic thyme
1/4 cup organic shredded parmesan
Slice potatoes into 1inch size pieces. Toss all ingredients together in large bowl. Spread into a greased baking dish or parchment lined baking sheet. Bake at 400 degrees for 45 minutes or until tender.
Friday, August 10, 2012
Creamsicle Popsicles

So in the spirit of summer, here is another yummy popsicle recipe!
Organic Creamsicle Popsicles
by Amanda @ Natural and Organic Lifestyle
1 cup fresh squeezed organic orange juice (I used 2 oranges)
1 cup organic milk or cream (I use organic raw cows milk and it's very creamy. Organic raw cream would be MORE creamy. I've also used coconut milk which was still very good but not as creamy, my kids LOVED it but they've never had a "real" Creamsicle.)
1/2 ts organic vanilla extract
2 TB honey or to taste (You can use other sweeteners or none at all, this is to taste)
Optional: 1/2 ts orange extract (This will make it very organge-y. I think it's fine without it, but it's an option if you have it in the pantry)
Whisk all ingredients together and make sure honey or other sweetener is dissolved and mixed in well. Pour into your popsicle molds and freeze. I usually make them in the morning and they are frozen by dinnertime, or freeze overnight. Enjoy!
Tuesday, July 31, 2012
Sunflower Butter and Jelly Popsicles

Sunflower Butter and Jelly Popsicles
by Amanda @ Natural and Organic Lifestyle
6 frozen bananas (when freezing, I do have to suggest breaking them into small pieces first)
2 heaping spoonfuls organic sunflower butter
1/4 cup organic milk (raw cow's milk or coconut milk)
1 heaping spoonful organic sunflower butter (to mix in later)
3 spoonfuls organic jam/jelly (to mix in later, I used my blueberry jam)
In a food processor, blend bananas, milk, and 2 spoonfuls of sunflower butter, until smooth. Stir in the rest of the sunflower butter and the jelly/jam in a swirl. Spoon into popsicle molds. Freeze for 8 hours (I know, this is soooo long to have to wait!!!) Enjoy!
 |
| Smooth banana/sunflower butter mix |
 |
| With sunflower butter and jam swirled in |
Monday, July 30, 2012


Sunday, July 29, 2012
Apple Cider Vinegar
Check out this great graphic from Natural News. Apple Cider Vinegar is great for your health. Put a few ts in a glass of water and sip. You can mix in a little raw honey for added benefits too!


Thursday, July 26, 2012
Fermented Salsa

This is adapted from Sally Fallon's book "Nourishing Traditions"
Fermented Salsa
by Amanda @ Natural and Organic Lifestyle
4 organic tomatoes, peeled, seeded and diced
1 medium organic onion, diced
1 organic jalapeno, chopped
6 cloves organic garlic, chopped
1 bunch of cilantro, chopped
1 ts dried organic oregano
Juice from 2 lemons
1 TB real salt
4 TB whey (only homemade whey. Sally Fallon says you can subsitute with an additional TB of salt but I think that would be pretty salty, but worth a try(
1/4 cup filtered water
To peel tomatoes easily, boil water in a pot and dip tomatoes in for 5 seconds, they should peel easily at this point.
Mix all ingredients together in a large bowl and stuff into a wide mouth quart size mason jar.With a wooden spoon or pounder, press down gently on the mixture so the water rises above the veggie level. If the water doesn't rise above the salsa, add a little more water. You want atleast an inch between the top level and the rim of the jar...it will expand....and leak all over your counter if it's not. Put the cap on tightly and leave at room temperature for 2 days and then transfer to the fridge.
Enjoy!
Wednesday, July 25, 2012
Pineapple Pops

So in the spirit of the warmth, I've been making popsicles like crazy. My kids are torn between these and the strawberry ones as their favorite. Though I couldn't get a pick of the strawberry ones before they were devoured and looking at the pick above I barely got a pic of these ones!
Pineapple Pops
by Amanda @ Natural and Organic Lifestyle
1 cup pineapple
1 banana
1 cup coconut milk
1/2 ts vanilla
Combine all ingredients in a blender and pour into popsicle molds. Freeze all day or overnight. This makes about 8 pops depending on how big your molds are. For me it made 4 big ones, and 4 small ones.
Enjoy!
Tuesday, July 24, 2012
Blueberry Jam

This last weekend we picked 50 lbs of blueberries. When we got home I realized I still had 5 gallon size bags from last year =/ Not sure how that happened. Sooo....blueberry jam it is! I'm not an expert jelly/jam maker but I have made it many times over the years and this is the easiest I've ever made! So get out there and pick some blueberries and make this!
This made almost 4 pints of blueberry jam. Feel free to increase or decrease as needed. Some like to do it in half pint jars...not me, we go through a lot of jelly/jam and I don't want to be constantly going to get a new jar.
Blueberry Jam
by Amanda @ Natural and Organic Lifestyle
4 lbs blueberries
2 1/4 cup organic sugar
1 cup water
4 sterilized pint jars and lids, keep warm while making jam
Wash and pick through blueberries, removing stems and leaves. Place in a large stainless steel pot. With a potato masher, crush the blueberries. They don't have to be completely crushed, just mush about a layer of them leaving some whole. Add water. Cook over medium heat, simmering until berries are tender. Add sugar and stir well. Boil rapidly, stirring often, until it reaches the jelling point.
Jelling point can be determined many ways, do your research. But I like to use a thermometer to keep an eye on it until it's almost there. At sea level the jelling point is around 220 degrees F. Before it hits 220, I place a small plate in the freezer. Once the temp gets close I pull the plate out and put a small spoonful of jam on it and place back in the freezer for a few minutes. To avoid overcooking you may want to remove the pot from heat while you wait to check it. When you pull it out, run your finger through the middle. If it runs right back together, you need to cook longer. If it slowly runs back together it will be a soft mold. For a harder mold you want it to not come back together but leave the line down the middle.
Once you've reached the jelling point, spoon jam into warm pint jars leaving 1/4 inch head space and put lids on. Process for 10 minutes.
Enjoy!
Tuesday, June 26, 2012
Fresh Mozzarella Pesto Grilled Cheese

Fresh Mozzarella Pesto Grilled Cheese
2 slices organic sourdough bread
2 TB garlic scape pesto or any other pesto
2 slices fresh mozzarella
2 tb organic butter
Butter both sides of your bread and warm in a pan. Carefully spread pesto on the inside of each piece. Lay cheese on top of one piece and top with other piece of bread. Grill until cheese is melty. Serve with some tomato soup with shredded Parmesan sprinkled on top.
Garlic Scape Pesto

Garlic Scape Pesto
1 cup garlic scapes (about 6 or 7) chopped into small pieces, flowers removed
1/3 cup organic cashews, or you can use pine nuts (I can't get organic pine nuts)
1/2 cup extra virgin olive oil, organic (approx. 3/4 cup if you want it for pasta sauce)
1/2 ts good salt
pepper to taste
Shredded Parmesan to taste (I used a couple TB)
Put scapes and nuts in the food processor and process until smooth-ish. Drizzle olive oil in until well combined and smooth. Remove from processor and stir in salt, pepper, and Parmesan. Spread on your sandwich bread and enjoy!
Thursday, June 14, 2012

Homemade almond butter

Raw almond butter
2 cups raw organic almonds
pinch of real salt, or to taste (optional)
1-2 tb maple syrup or honey, or to taste (optional)
Place almonds in food processor. Note: if you keep them frozen, thaw them first. Process in food processor, scraping down sides as needed. Once it gets past the floury stage and starts getting paste-like, add the salt and sweetener. Process until smooth and creamy. This usually takes about 10 minutes, then you have fresh raw almond butter to enjoy!
Tuesday, May 15, 2012
Homemade Sauerkraut

Ingredients:
1 head organic cabbage
1 TB real salt
4 TB homemade whey (optional)
Remove outer leaves of cabbage. Shred the cabbage, minus the core. I use they shredding disk in my food processor. You could shred by hand or slice really thin with a knife if you'd like. Place shredded cabbage in a big bowl. Toss with salt, and whey if you're using it. Pound it really good, you want to release the liquid. I usually start by pounding it with a potato masher, then I squeeze it really good with my hands (obviously wash them well first)...then I place a bowl or plate on top of the cabbage with weights on it and let it sit for a half hour or so to get more liquid out.
Like this:
 | |
| Don't mind the tiny sliver of carrot that accidentally got mixed in from a batch with carrots =) |
The first batch of sauerkraut I made was SO exciting! After the fermenting time, I opened up the jar and took a bite. I kept yelling "I made sauerkraut!!!" The kids kind of thought I was nuts. They obviously just don't understand how expensive a jar of organic sauerkraut is!

Subscribe to:
Posts (Atom)